Category Archives: Credits

Project Of The Day: LED Dragon Kite

It’s only a short while before our lovely, typical, Portland weather returns. Enjoy the clear skies while they last by lighting up the sky with this really neat kite!

The talented folks at High-Low Tech have put together this fantastic tutorial for you to follow.
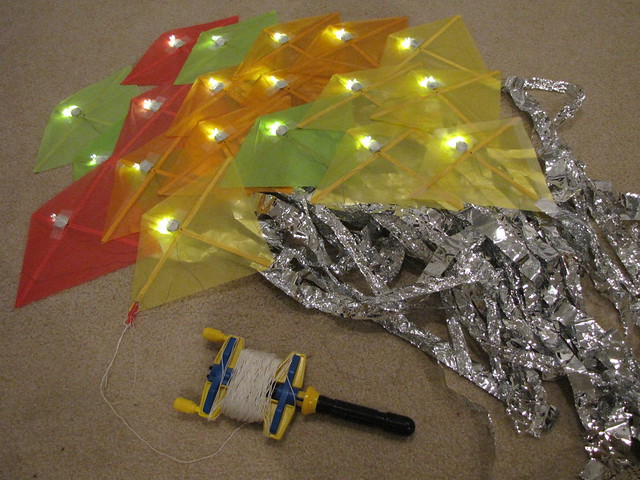
LED dragon kite

Materials and Tools

materials

Materials:

– 1 package of tissue paper
– 1 kite stencil (download here)
– 1 spool of kite string
– 1 package plastic foil gift wrap – any thin mylar foil works
– 20 x thin basswood strips (1/16” x 1/18” x24”) or 1 strip per kite
– 10 x 3V coin cell batteries or 1 battery for every other kite
– 10 x through hole LEDs, for example these white LEDs
wood glue
scotch tape

Tools:

– scissors
– needle

Instructions

Step 1: Print and cut out the kite stencil

Step 2: Trace the stencil onto the tissue paper and cut out the shape

Step 3: Cut one basswood strip into lengths 23cm (9 in) and 27cm (10.5 in).

Step 4: Glue the shorter 23cm (9 in) strip to the vertical center of the kite cutout. Tip: add a few drops of wood glue to the strip, spread it out along the entire strip with a brush or your finger and then press firmly onto the kite cutout.

Step 5: Glue the longer 27cm (10.5 in) length strip horizontally to the kite cutout, matching the corners of the cutout.

Step 6: Cut 3 strips 61cm (24 in) by 2.5cm (1 in) strips out of the plastic foil to make the tails and tape them onto the bottom of the kite

Step 7: Cut 90 cm (1 yard) of kite string and thread through large needle. Then attach one end of the string to the kite. Sew through the kite, around the basswood strips, and tie the two ends of the kite string together, as shown in the diagram and photos below. You will want about 1 in of kite string left over on the shorter end.


Step 8: Repeat Steps 1 through 7 until you have made a total of 20 kites.

Step 9: To attach the kites to each other, sew the long end of the kite string through the cross on the front of the kite (the side without the wood strips).

Now the kites are ready to fly!

It is helpful to test out the kites without the additional weight of lights. Fly the kites so that the face with wooden strips faces away from you. When flying on a windy day, let out one kite at a time, starting with the kite furthest from you. If there is less wind, have a friend help you hold the entire chain up off the ground and run to get the kites airborne. It’s really important that you make the kite as symmetrical as possible, to prevent spinning. If it does spin, it helps to make the tail longer, or add more tails add a longer tail.

Step 10: Turn on the LED light by clipping the LED to the battery. Make the long leg touch the “+” side of the battery and the short leg touch the “-“ (or unlabeled) side of the battery. If the LED doesn’t turn on, the direction is probably reversed so simply flip the LED around and it should light up. Tape the LED to the battery once it turns on.


Step 11: Tape the LED+battery to the back of the kite (the side with wooden strips). Place it as close as possible to the intersection of the wood strips, without blocking the string.

Step 12: The kite is ready for nighttime flying!


Happy flying!


Leave a comment

Filed under Credits, DIY

You Rock!

Without the willingness of community members in the larger Portland community showing nearly the level of excitement for these workshops as I experience hosting them, there is chance I would have walked away before ever trying. Were that the case, Captain Wonderful, Ismo, MovqsgBlfIm, Nurse Awesome, Rose, Shadow Man, Skipinated, Snoopy, Tone, Bullet Brain, Leo the Lopper-Venusman, Mack O’roni Donovan Loc, Ms. Brat, Way Show-er Descended, Master of Light , and Johnny Drifter may not be realized.
So, it is with a truly happy heart that I extend a special thanks to and for those who have encouraged, and at the very least tolerated, my inquires during the planning stages for the workshop in 2010.

Even our non-comic minded staff at the Macdonald Center, embrace the benefits of the Discovering Empowerment Through Creativity workshops. One of whom, submitted an article to the Oregonian! Also, a founding board member, Tom DeJardin, retired on July 27th, 2011, but he is excited to join us in September to lend his artistic talents drawing our beloved heroes. Most of our workshops have involved communicating through words, and I’m super excited to see how Tom will translate those words into pictures.

Since the first workshop in February, 2011, we have avoided the dreaded curse of building participant interest from despondence and reluctance. Even then, while I was hopeful, the participants commented they thought I was losing my marbles when I presented the idea they can indeed be super heroes and that I jumped further off the deep end when I presented their first mission. Luckily, the intrigue and presentation won them over. In the past five months, the Squad for Good continues our exciting path of self discovery through workshops, efforts to develop a mission statement, and starting August 4th we begin the Campaign of Kindness.

So, once again, I want to express my deepest gratitude for your ideas and encouragement. I look forward to continuing working with you, working with more of you in the future, and sharing more amazing stories with you as the workshops progress.

Leave a comment

Filed under Community Building, Credits, DETC

Won’t you be my neighbor?

If you haven’t had a chance to hang out with your fellow geeks, nerds, and oddballs at OSBridge 2011, you’ve got ONE MORE CHANCE! Tomorrow is the final day to attend! Get ye to the Elliot Center for the fun-filled day of building, hacking, networking, and nom-ing.

Want to experience the feel of the hacker lounge on a regular basis? Check out Brain Silo! Portland’s fledgling hackerspace!

Needing a more structured, venture nurturing, downtown space? Head over to Souk!

Have opinions about how either of these places can provide a more inviting community building space? They want to hear from you! Adam is available Friday, June 24th, at OSBridge and is eager to hear what you need from a creative and professional workspace.


Cacophonous Creations wants to send a huge THANK YOU and award for Excellence in Community Development to Shannon Henry of Polymath Design Lab for demonstrating Upcycled Electronics during this weekend’s Maker Faire in Vancouver B.C.!


For community building of a more super variety, head over to the DETC site for mission updates and the touching insight of Shadow Man and Rose!

Leave a comment

Filed under Community Building, Credits, DETC, Events, Upcycled Electronics